SOLVED How to check your old/current WIFI Device/Hotspot password

 Hello Guys,

Today I came up with new article to show you the steps to view the password of your OLD Wifi device/Hotspot.

To list the all the wifi devices connected to this machine

--> netsh wlan show profile

Select the required wifi device name/SSID to check the password.

----> netsh wlan show profile BALAJI key=clear

eg : In my case BALAJI is the wifi device name/SSID

Hope you enjoyed this article.

Thank you!!

How to see application service uptime

 Hello Guys,

As we are aware uptime command in Linux will show how long is the server up.

Last reboot - This will show you the last reboot of the system.

To check application uptime/running time:

ps -ef | grep <service name>


eg: ps -ef | grep <tomcat> (If your application uses Tomcat)
ps -ef | grep <jboss> (If your application uses Jboss)

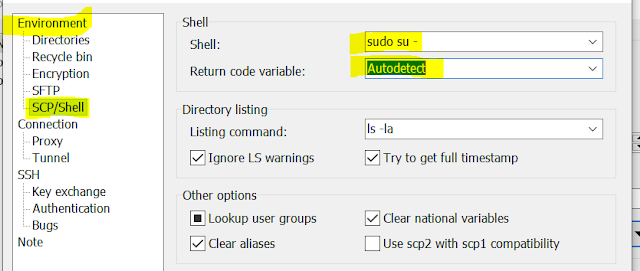
Transfer files using Winscp as root user

 Hello Guys,

In some environments while transferring the files from local machine to the remote server uses LDAP account as ownership of the file.

In this tutorial we are going through the process of transferring the files from local machine to the remote server with root user.

Now open Winscp tool.

Change the session settings to scp


Provide Hostname, username and password 

Click on advanced -

Click on Advanced and change the settings


Click on OK 

Now copy the files from left window to second window.


How transfer files using Winscp bypassing Jumphost

WinSCP is a free and open-source SFTP, FTP and SCP client for Microsoft Windows.

Its mainly used for secure file transfer between a local computer and remote computer.

Download Winscp tool from the portal.

Normal file transfer:

Now Open Winscp tool and will show the below screen for login. Enter the below details

Hostname :
Username :
Password :


Transfer files using Winscp by-passing Jumphost :

Now Open Winscp tool and will show the below screen and navigate to advanced drop down and select advanced.

Now you can find the below settings
Now navigate to connection section and click on tunnel and Enable SSH connect through tunnel
Now provide Jumphost ( jump server ) details and click on OK
Now provide the target/ destination server details for successful transfer from local machine to target machine bypassing jumphost.


Target/ destination server
Hostname :
Username :
Password :


How to change password in Remote Desktop(RDP)

Hi Guys,

Today I came with the new trick for changing the password in Remote Desktop (RDP)

In general, we use Ctrl + Alt + Delete hotkeys for changing the password.

But, this will not work for changing the password in the remote desktop environment.

The above command will affect the change on the local computer.

Now we should use Ctrl + Alt + END keys for changing the password in remote desktop level.

Regards,
Balaji.

solved:The network folder specified is currently mapped using a different user name and password first disconnect any existing mapping to this network share

Hi Guys,

follow the below steps to fix the issue:

Method1:

Step1: Locate if there are any shared networks available from the command line using the 
command: net use and locate the shared folders

Step2: If you locate the shared file then delete it by using the following 
command: net use* /delete

Note: If you unable to locate any shared folder paths and if the issue persists then try to fix the issue using method2


Method2:

 Step1: Open àFile explorer à check for network connections.

If you locate anything shared drive there delete it by using following the path:

C:\Users\username\AppData\Roaming\Microsoft\Windows\Network Shortcuts


Step2: Now try again to set up the network drive again it will work.


Method3:

Once after trying to map the drive if you are using it for different users and trying to logging using different credentials earlier.

Now try connecting to it directly.


Thanks,
Balaji.

Trouble shooting steps for SharePoint/Shared path

Hi Guys,

Step1: Disconnect if there is any mapped network drive exists.

Step2: Now open internet explorer and navigate to internet option --> go to Advanced tab --> click on Reset button --> check the box and click on Reset.

Step3: Now delete Cache and cookies from the browser.

Step4: Now restart the machine.

step5: Once restarting is done 

Note : If proxy is needed to access the sharepoint then enable proxy using internet options --> navigate to connections --> enable proxy (give proxy address)  

Make sure to uncheck the box automatically detect the settings.

Step6: Now add the sharepoint site to trusted sites using internet option form IE browser navigate to security tab and go to trusted sites and click on sites to add the required site to whitelist.

Step7: Now login to sharepoint site using your IE web browser.

step8: Now goto file explorer and click on this PC --> right click and go to map network drive.

Step9: select the drive letter and and shared path by clicking on drop down button --> check the box connect using different credentials. (If you are using High density machine)

Step10: Now enter login credetials of that machine. 

Step11: that's done. Now you were able to access the mapped network drive.